You are here: Wiki>Geoprocessing Web>WPS-ArcMap-Client>EDCDevForumWorkshop-07-2013 (28 Jan 2014, EikeJuerrens)Edit Attach
EDC Developer Forum Workshop 2013-07-19
Installation
Just download the installer from here, double click on it and follow the inctructions. Note: If you are using ArcMap 10.1 and upgraded from 10.0, make sure the Client is installed in the right directory (e.g. C:\Program Files (x86)\ArcGIS\Desktop10.1).Adding WPS processes
Start ArcMap. Open the Catalog Window (Windows -> Catalog). Open the GIS Servers tree. You should see a "Add WPS Server" item in the tree.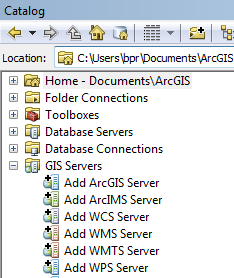 A double click on the item brings up the following dialog:
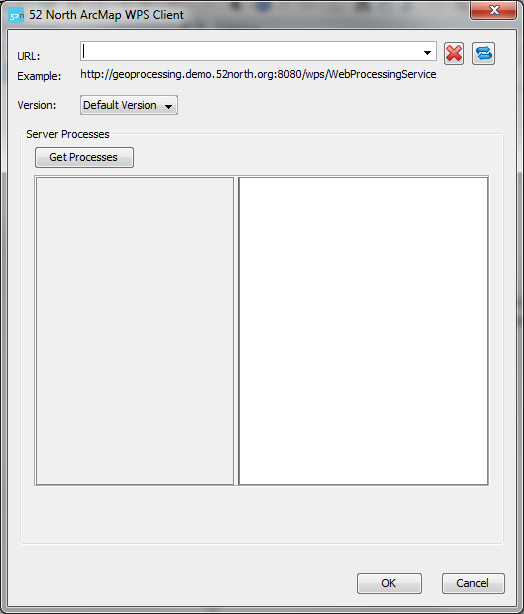 A predifined list of WPS-URLs comes with the installation. Select "http://geoprocessing.demo.52north.org:8080/wps/WebProcessingService" and click "Get Processes". Leave the default version.
You will see a list of available processes appearing. A click on one of the processes will show information about the process.
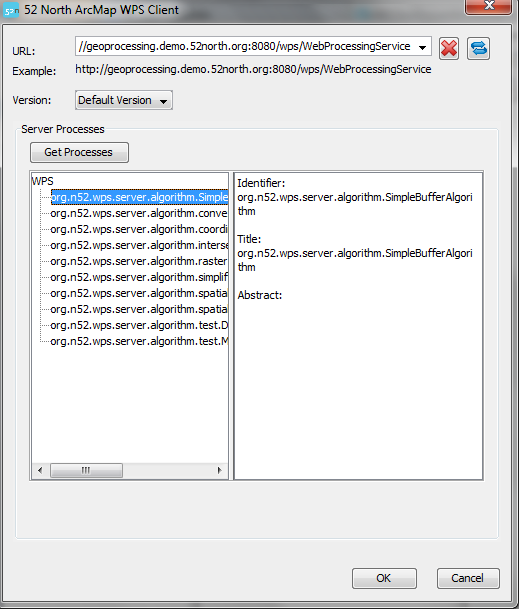 Select the SimpleBuffer process and click "OK".
Note that you can add more than one process at once.
The process will be wrapped into a ArcMap Geoprocessing Tool and added to your toolboxes. In the Catalog window open the tree "My toolboxes".
There should be a toolbox named "WPS.tbx". If you open it you should see a toolset "http://geoprocessing.demo.52north.org:8080/wps/WebProcessingService".
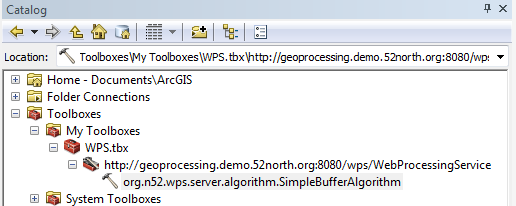 This toolset contains the WPS process we just added.Its name is the process identifier "org.n52.wps.server.algorithm.SimpleBufferAlgorithm". A double click brings up the tool dialog:
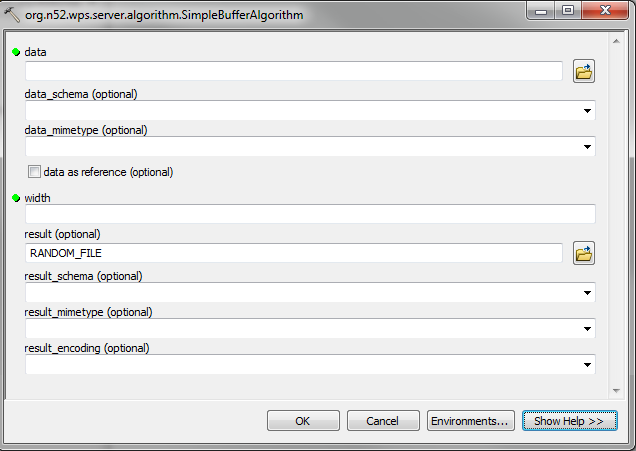 Have a look at the schemas and mimetypes. These are collected from the process description.
You could execute the process right away, if you had an input file that would match one of the schemas/mimetypes.
To execute the process with data coming from an ArcMap layer, we have to add some more tools.
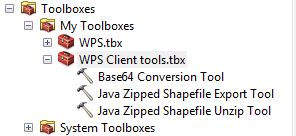
Right click on "My Toolboxes" and select "New -> Toolbox". Name the new toolbox something like "WPS Client tools".
Right click on the new toolbox. Select "Add -> Tool".
 Check Base64ConversionFunctionFactory, ZippedShapefileExport and -UnzipFunctionFactory and click "OK".
Geoprocessing vector data
Create a new toolbox named "models". Right click on the new toolbox and select "New -> Model". A new Model Builder window will be opened with an empty model. Go back to the WPS process tool ("org.n52.wps.server.algorithm.SimpleBufferAlgorithm") and drag it in the new window. Go to the "WPS Client tools" and drag the Shapefile Export and Unzip tool in the window.
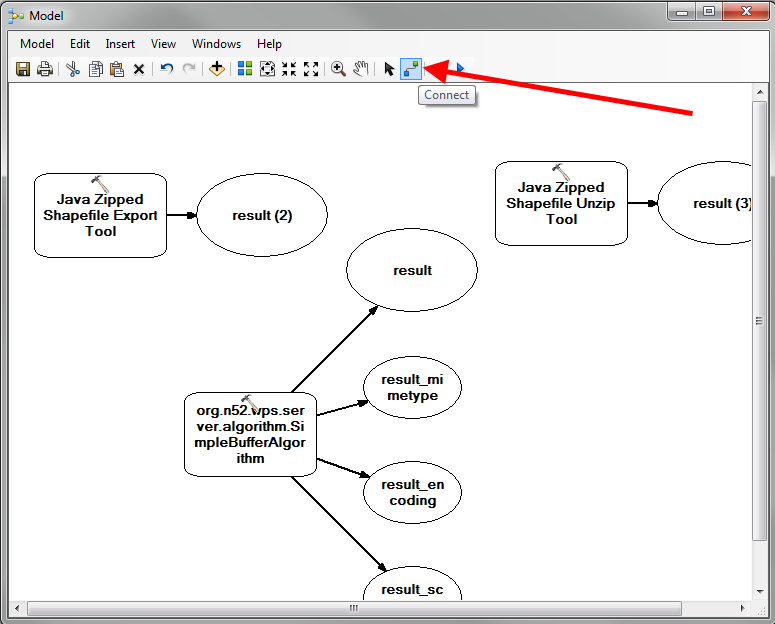 Click the "Connect" button. Click on the result parameter of the Shapefile Export Tool and then click on the SimpleBufferAlgorithm tool. Select data.
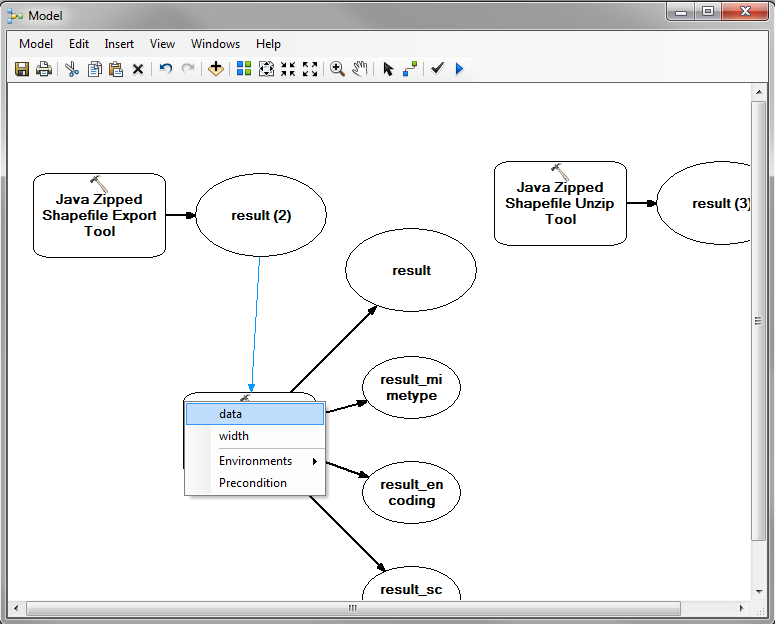 Click on the result of the SimpleBufferAlgorithm tool and then click on the Shapefile Unzip tool. Select "Input Filename".
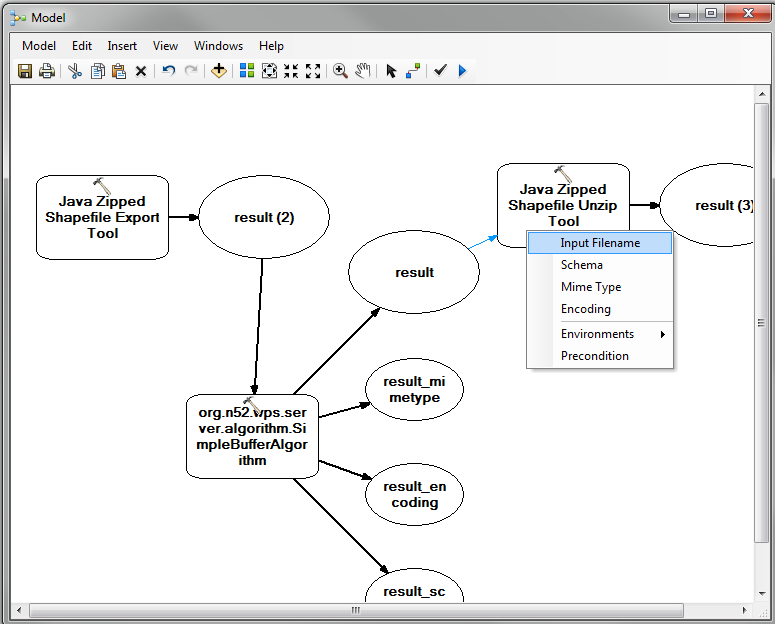 Do the same for result_mimeType and select "Mime Type" and for result_encoding and select "Encoding".
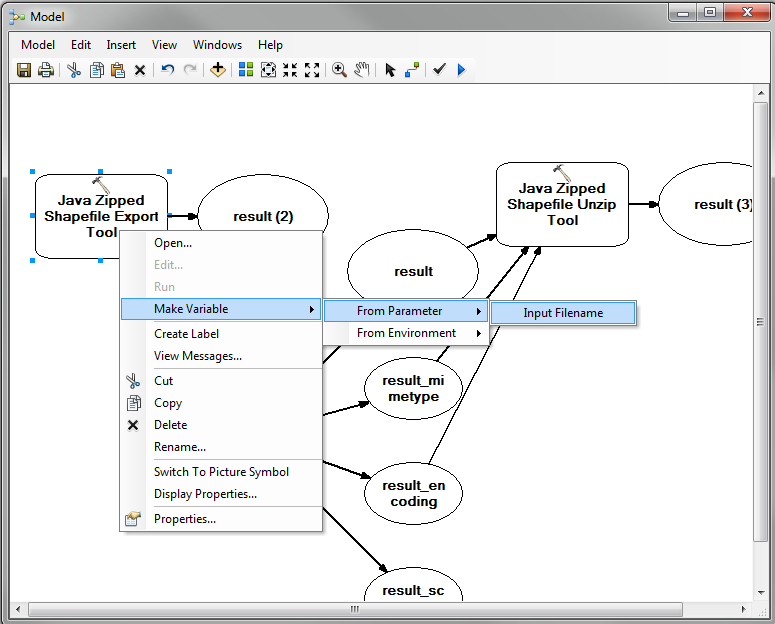
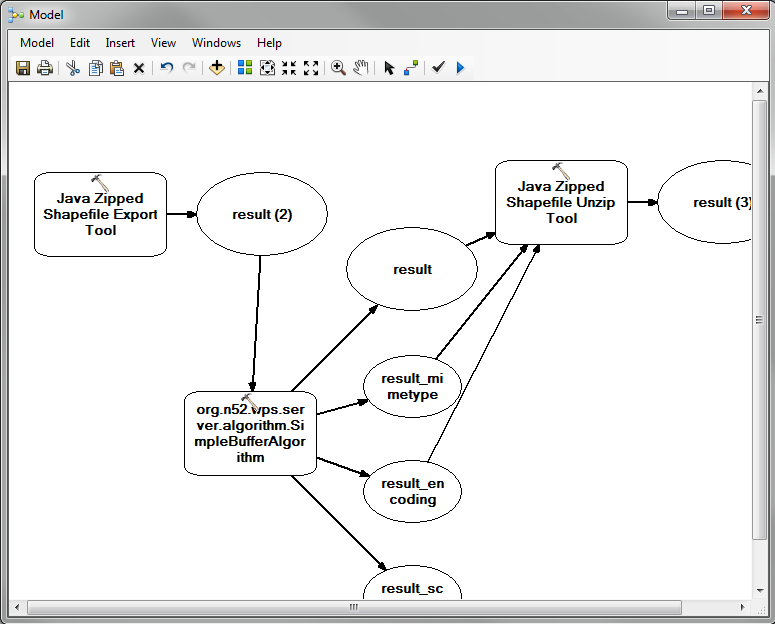 Right click on the Shapefile Export tool and select "Make Variable -> From Parameter -> Input Filename".
 Right click on the new element and select "Model Parameter".
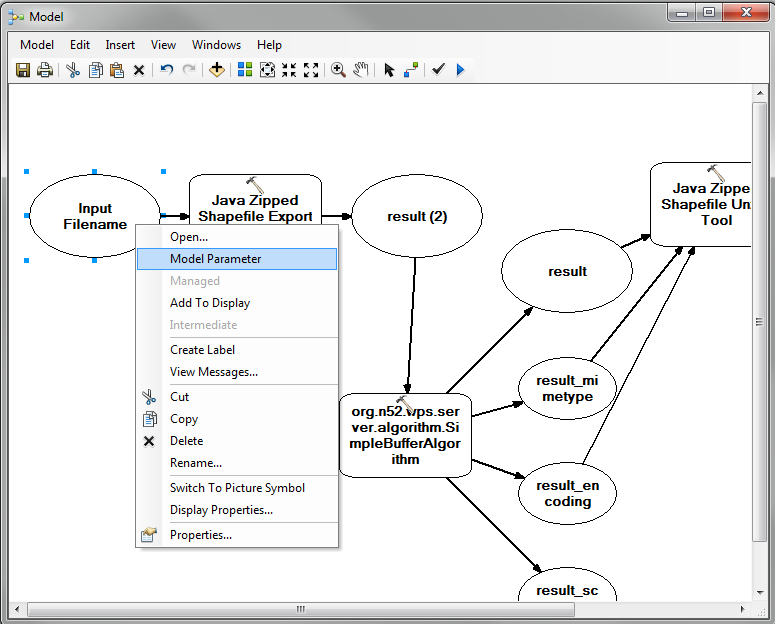 A "P" should appear on the top right of the element. Right click on the SimpleBufferAlgorithm tool and select "Make Variable -> From Parameter -> width".
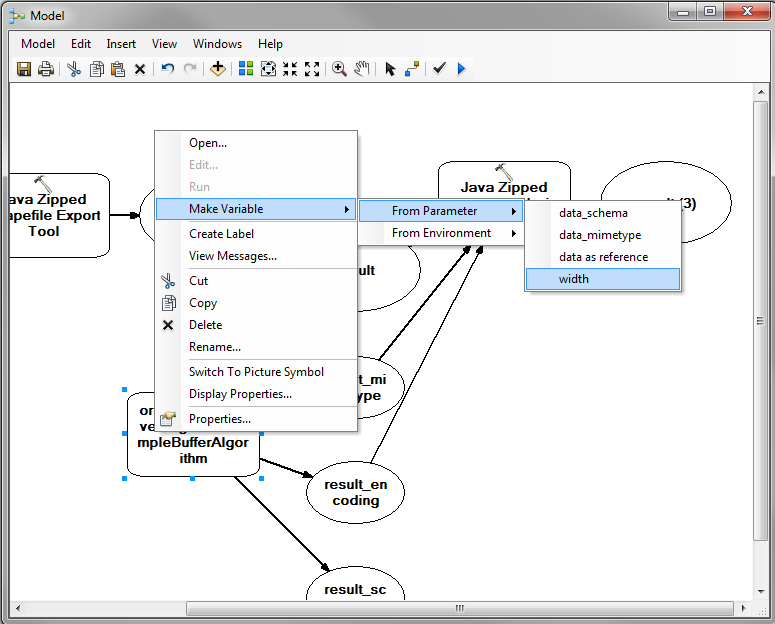 Make this a model parameter, too. Also make the result of the Shapefile Unzip tool a model parameter.Your model should now look similar to this:
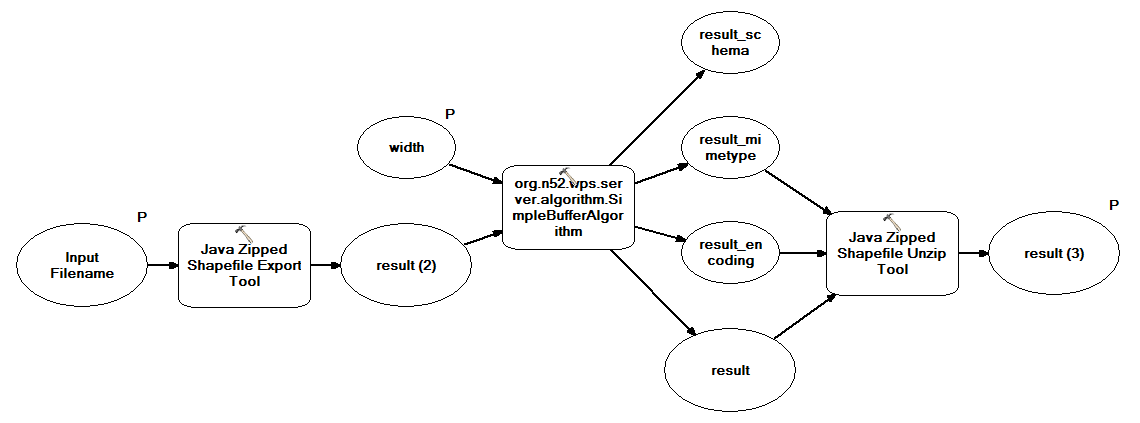 Double click the SimpleBufferAlgorithm tool.
 Select "application/x-zipped-shp" as the data_mimetype. Do the same with the result_mimetype and select base64 as result_encoding. Note: The RANDOM_FILE variable is a special identifier, please do not touch it in this case.
Click "OK". Save the model and close it. If you double click the model, a dialog will appear.
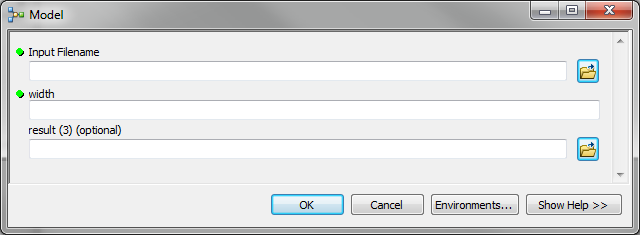 Here we can add input data and specify, where the result should be saved.
But first let us add some data. Close the model dialog. Add the tasmania_roads shapefile (tasmania_roads.zip).
Now open the model again. For the input parameter there is a drop box enabled with the tasmania_roads layer. Choose the layer from the drop box.
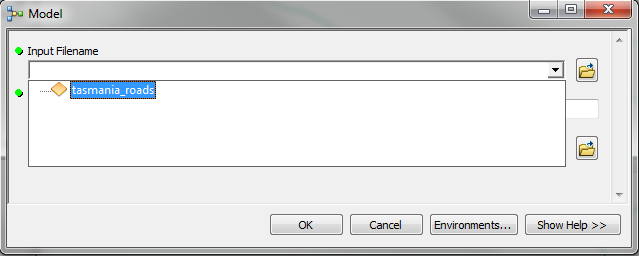 We choose a width of "0.2" (decimal degrees). For the result choose any filename and append the suffix ".shp".
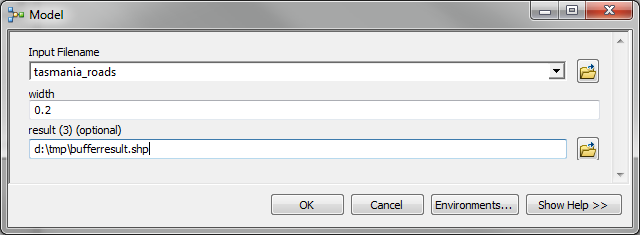 Click "OK" to execute the process. You will see a dialog showing the log outputs.
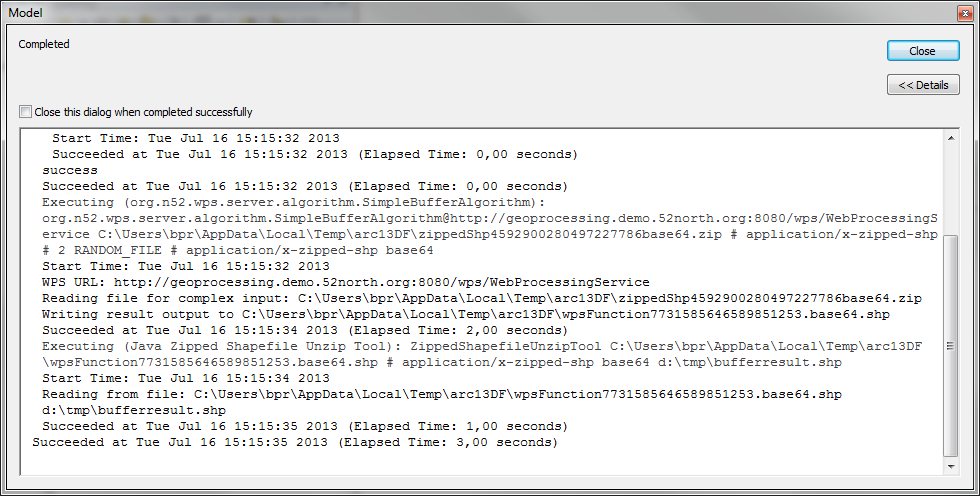 In case something should go wrong you would see an error message appearing there. After a successful execution close the dialog. Switch to the results window (Geoprocessing -> Results).
Open the Current Session tree and the Model [XXX] item. Right click on "result XXXXX" and select "Add to Display".
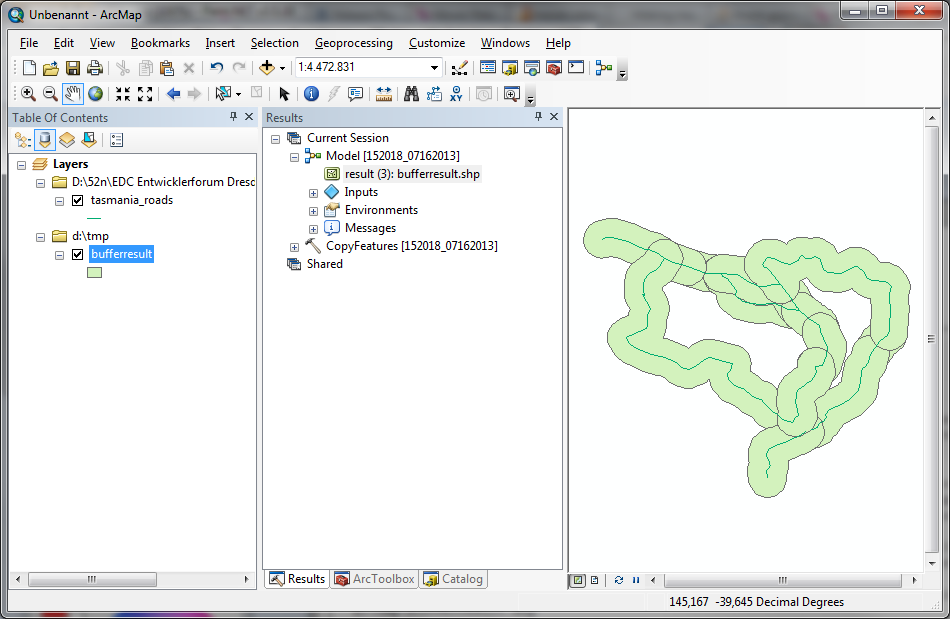 The buffered result should appear on the map.
Chaining WPS processes
Please add another WPS process, this time the "org.n52.wps.server.algorithm.!ConvexHull.!ConvexHullAlgorithm". Create a new model, add both Shapefile Tools, the SimpleBuffer tool and the new ConvexHull tool. Connect:- The Shapefile export tool result to the SimpleBuffer data input
- The SimpleBuffer result to the ConvexHull FEATURES input
- The SimpleBuffer mime type to the ConvexHull FEATURES mime type
- The ConvexHull RESULT to the Shapefile Unzip tool Input Filename
- The ConvexHull RESULT mime type to the Shapefile Unzip tool mime type
- The ConvexHull RESULT encoding to the Shapefile Unzip tool encoding
- Shapefile export tool input Filename
- SimpleBuffer width
- Shapefile Unzip tool result
- SimpleBuffer tool data mime type
- SimpleBuffer tool result mime type
- ConvexHull RESULT mime type
- SimpleBuffer tool result encoding
- ConvexHull RESULT encoding
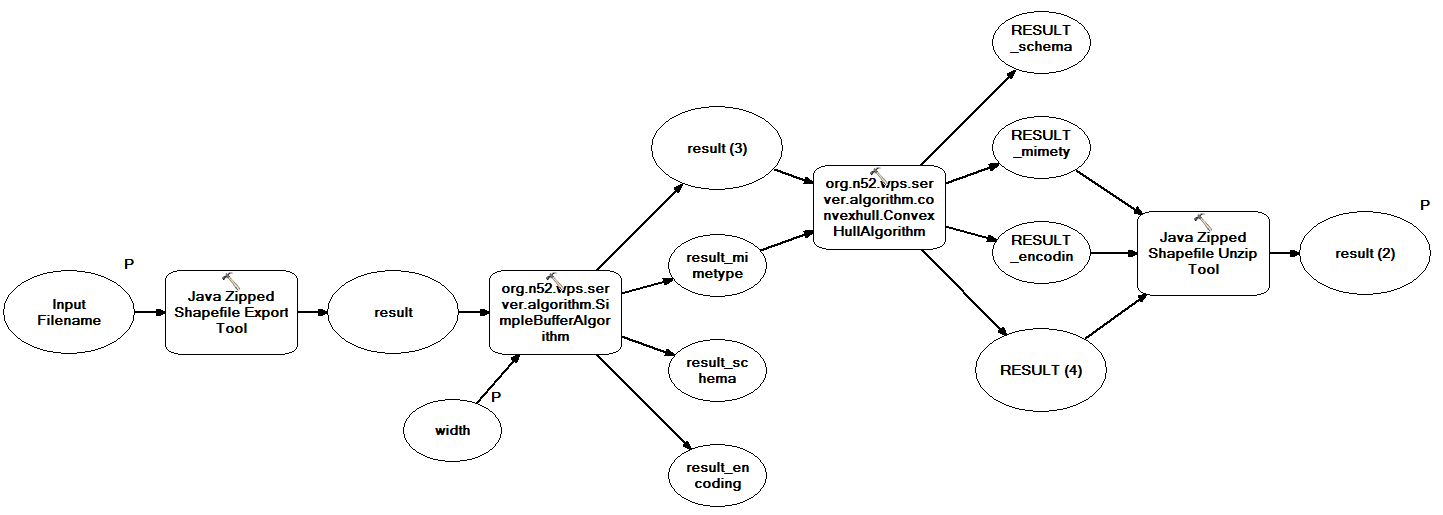 Double click on the new model. The dialog should look like the one from the first model.
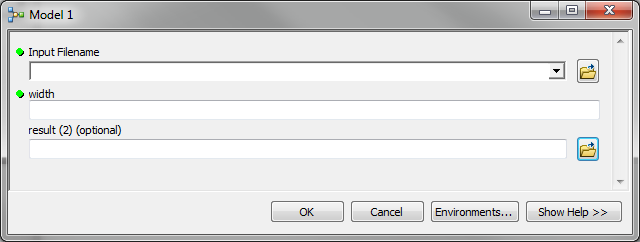 Select the tasmania_roads again and a width of "0.2". Also choose an output filename. Click "OK" and add the results to the map:
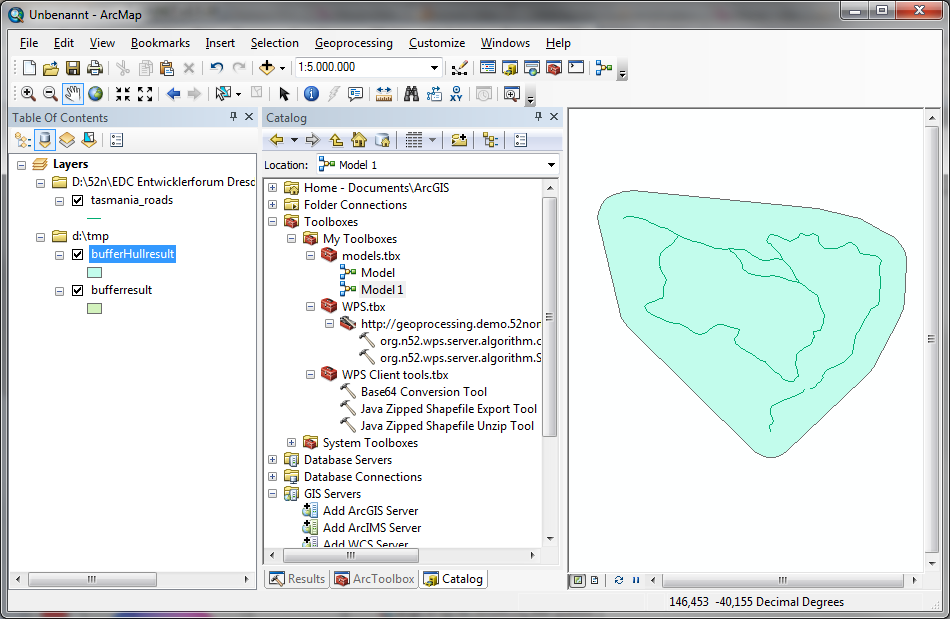 Note: You could also add the intermediate result of the SimpleBuffer tool to the map. However, you will have to decode it first using the Base64Conversion tool.
Raster data processing
Open a new blank map. Add the process "r.los" from "http://geoprocessing.demo.52north.org:8081/wps/WebProcessingService". Hint: The process list is sorted alpabetically. Also, if you select a process from the process list, you can jump to other processes by typing characters. Create a new model. Add the r.los tool and also two times the Base64 Conversion tool from the WPS Client tools. This tool de- and encodes files in base64. We need to encode binary inputs and outputs (like images or shapefiles) in base64 because the data is send wrapped in a XML execute request. Connect:- The output of the first Base64 Conversion tool to the input of the r.los tool
- The output of the r.los tool to the input filename of the second Base64 Conversion tool
- The input filename parameter of the first Base64 Conversion tool
- The coordinate parameter of the r.los tool
- the obs_elev parameter of the r.los tool
- The input_mimetype parameter of the r.los tool
- The output_mimetype parameter of the r.los tool
- The output_encoding parameter of the r.los tool
 Save and close the model. Add the elev_ned_30m.tif to the map (elev_ned_30m.tif). Open the new model. Select the elev_ned_30m layer. Use "641858,226042" for the coordinate and 155 for the obs_elev. Specify a filename for the output file. Add the suffix ".tif"
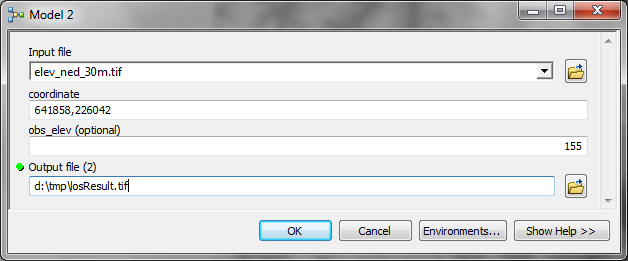 Click "OK" to execute the model. Add the result to the map:
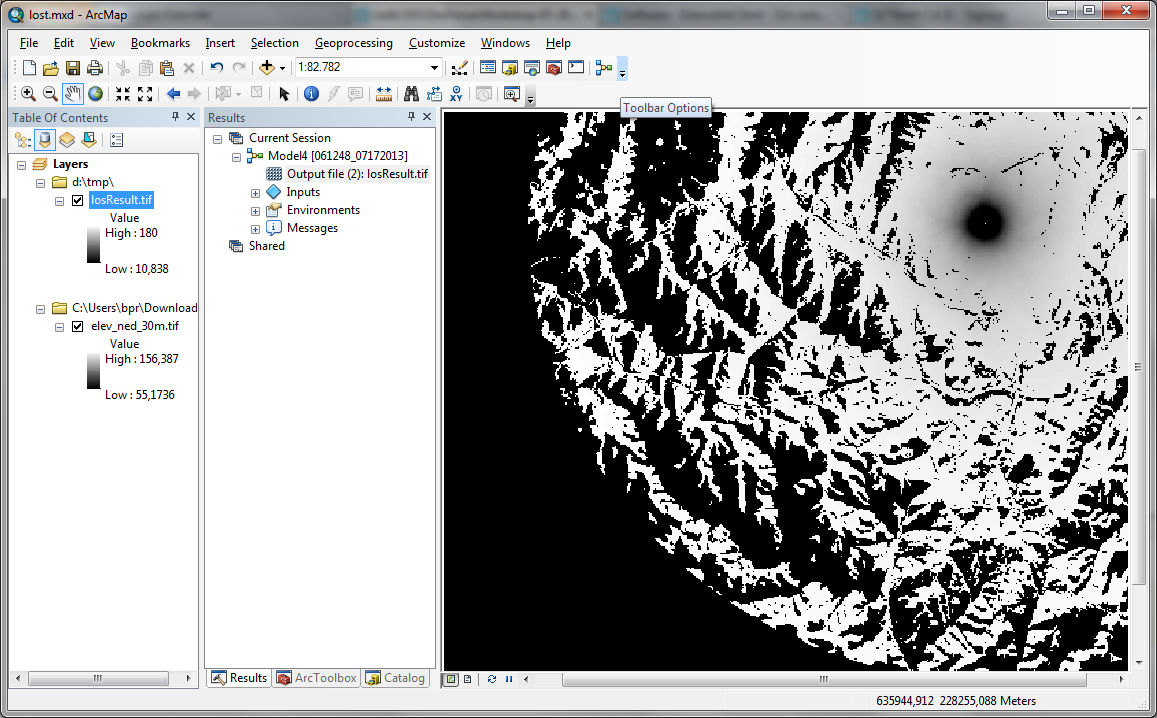 You can try out the process with other coordinates and obs_elev values. You can pick coordinates with the identify tool
 Transforming and adding enviroCar Data to ArcMap
Open a new blank map. Add the process "org.n52.wps.server.algorithm.EnviroCarDataTransformAlgorithm" from "http://geoprocessing.demo.52north.org:8081/enviroCar-wps/WebProcessingService" to ArcMap. Create a new model and add the EnviroCarDataTransformAlgorithm tool and the Shapefile Unzip tool. Connect:- The EnviroCarDataTransformAlgorithm result to the Shapefile Unzip tool Input Filename
- The EnviroCarDataTransformAlgorithm result mime type to the Shapefile Unzip tool mime type
- The EnviroCarDataTransformAlgorithm result encoding to the Shapefile Unzip tool encoding
- The EnviroCarDataTransformAlgorithm parameter url
- The Shapefile Unzip tool result parameter
- The EnviroCarDataTransformAlgorithm tool result mime type
- The EnviroCarDataTransformAlgorithm tool result encoding
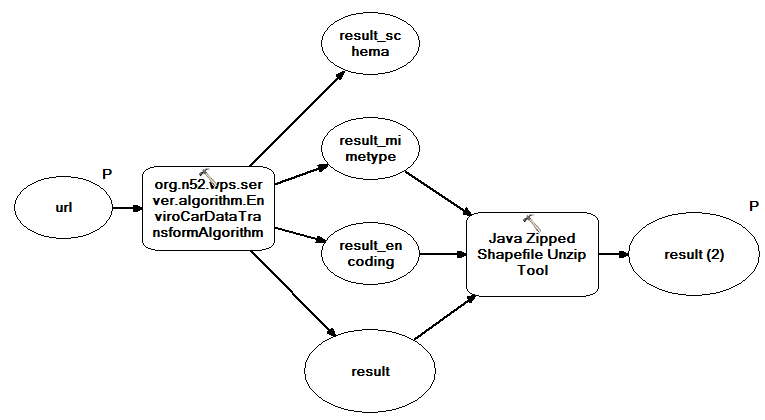 Save and close the model. Double click on the model. Use "https://giv-car.uni-muenster.de/dev/rest/tracks/51e8169be4b058cd3d3a3745" for the url. Choose a new .shp file as output.
 Click "OK" to execute the model. Add the result to the map:
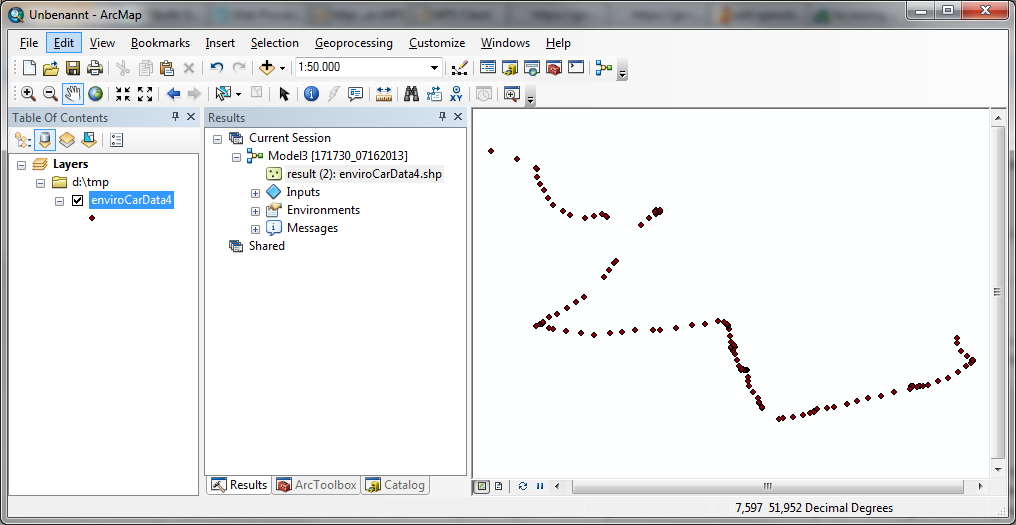 You can select other track ids from "https://giv-car.uni-muenster.de/dev/rest/tracks/".
Connect a WPS process with a build-in ArcMap Geoprocessing tool
We use the EnviroCarDataTransformAlgorithm tool for this again. Create a new model and add the EnviroCarDataTransformAlgorithm tool, the Shapefile Unzip tool and the Create Thiessen Polygons tool (System Toolboxes -> Analyst Tools -> Create Thiessen Polygons. Connect:- The EnviroCarDataTransformAlgorithm result to the Shapefile Unzip tool Input Filename
- The EnviroCarDataTransformAlgorithm result mime type to the Shapefile Unzip tool mime type
- The EnviroCarDataTransformAlgorithm result encoding to the Shapefile Unzip tool encoding
- The Shapefile Unzip tool result parameter with the Input Features parameter of the Thiessen polygon tool
- The EnviroCarDataTransformAlgorithm parameter url
- The Thiessen polygon tool Output Feature Class parameter
- The EnviroCarDataTransformAlgorithm tool result mime type
- The EnviroCarDataTransformAlgorithm tool result encoding
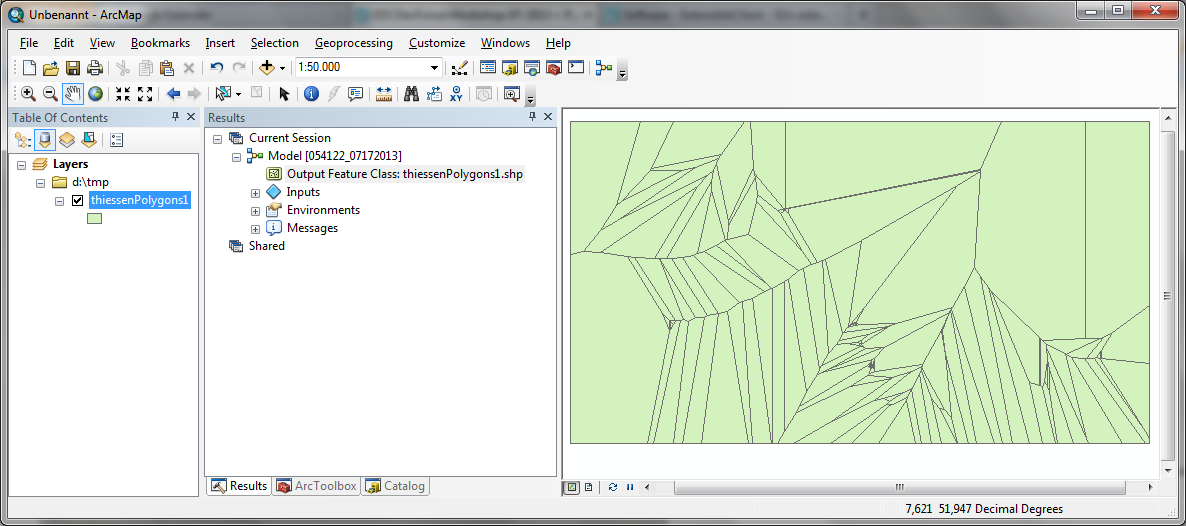
 Save and close the model. Double click on the model. Use "https://giv-car.uni-muenster.de/dev/rest/tracks/51e8169be4b058cd3d3a3745" again (or any other track you found) for the url. Choose a new .shp file as output.
The model dialog should look like the previous one. Click "OK" to execute the model. Add the result to the map:
 *
* Edit | Attach | Print version | History: r11 < r10 < r9 < r8 | Backlinks | View wiki text | Edit wiki text | More topic actions
Topic revision: r10 - 28 Jan 2014, EikeJuerrens
Legal Notice | Privacy Statement
 Copyright © by the contributing authors. All material on this collaboration platform is the property of the contributing authors.
Ideas, requests, problems regarding Wiki? Send feedback
 Copyright © by the contributing authors. All material on this collaboration platform is the property of the contributing authors.
 Ideas, requests, problems regarding Wiki? Send feedback


