|
|
You are here: Wiki>SensorWeb Web>SensorWorld>AdapterForSWEServices (15 Oct 2014, EikeJuerrens)Edit Attach
Adapter for SWE Services
Motivation
The idea is to combine Sensor World with other SensorWeb Services like SOS, SPS, SAS. The first approach was to connect the Sensor World Simulation with the Sensor Observation Service, using the SOS Feeder.SOS Mobile Adapter
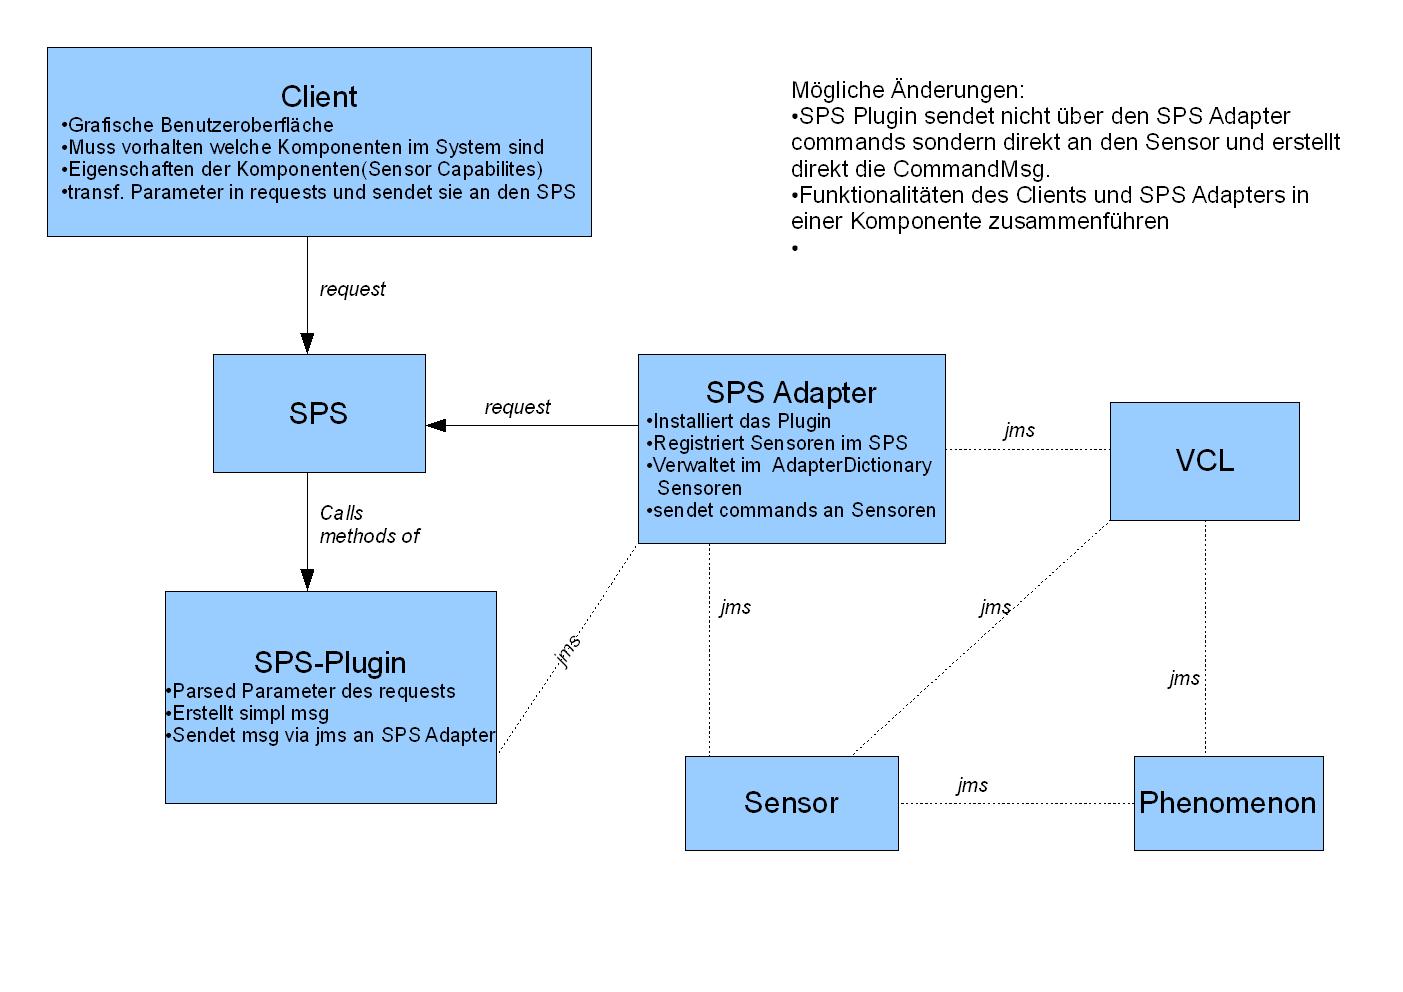
The Adapter is running as a seperate java application and listens to registration and measurement messages send in the simulation. The basic class Sos Adapter handles the mantaray connections and creates the consumers for the different topics used for measurement and registration messages. The class processes the incoming messages and passes it to the Sos Adapter Application class in which the final insertion to the database is happening. Before that the database is initialized by using from the SOSFeeder Framework predefined Database daos. When receiving a registration message of a sensor (procedure) or a phenomenon its added to the database and necessary relationsships for the SOS datamodel will be inserted using the insertion and relationsship daos. Afterwards it is possible to feed the database with observations of the sensor and also track its movement by creating a history of the procedures.SPS Adapter
The idea of connecting Sensor World with the SPS is to task the sensors via the framework of the SPS. For this purpose its necessary to implement an own SPS plugin suitable for the Sensor World architecture.The advantage of the SPS framework is the possibility to register various types of taskable sensors and make them accesible through the SPS framework.The plugin defines an installed class of a concrete sensortype (installed sensor to the SPS) and has its status and behaviour defined. For the completeness of the plugin there are several methods given by the SPSSensor interface which has to be implemented and are necessaray for running the plugin in the SPS. To run the plugin some steps have to be executed:- Fist of all its important to define the parameters the sensors need to be tasked. These parameters have to be defined in the sps:InputDescriptor section of the register.xml file. There the qualities of the sensor are described and you can define the constraints for each sensor instance.
- The plugin has to implement the Interface SPSSensor and its necessary methods. The task execution from a sensor is then done by the contained methods and the whole implementation of the plugin.
- install the plugin in the Asset Manager of the SPS via an install.xml file where the name of the plugintype and the class implementing the SPSSensor interface is defined
- register a sensor instance via a register.xml file: here all necessary sensor configuration informations have to be set in the SensorConfiguration element: Profile Information with SensorML information, Sensor capabilties, input descriptors, phenomenon. Since the Sensor Configuration element is set to the type "any" its possible to add any information necessary for the configuration. During the registration process the document with its information is processed by the implemented method configure().
Structure
Both the SPS and the plugin are running as independent projects and are connected in Eclipse via the module dependency which have to be set to make sure all necessary libraries and classes are found by the SPS. It is necessary to translate somehow the requeest of the SPS to our Sensor World Simulation and understandable its components. For this purpose we developed a structure of AbstractCommandMessages used by the adapter. The Adapter adresses via xml requests the SPS, which calls the implemented method submit() in the plugin for the specified sensor. The submit() method extracts the sensor parameter sent in the xml request from which the task command for the sensor world sensor is constructed.SPS Client
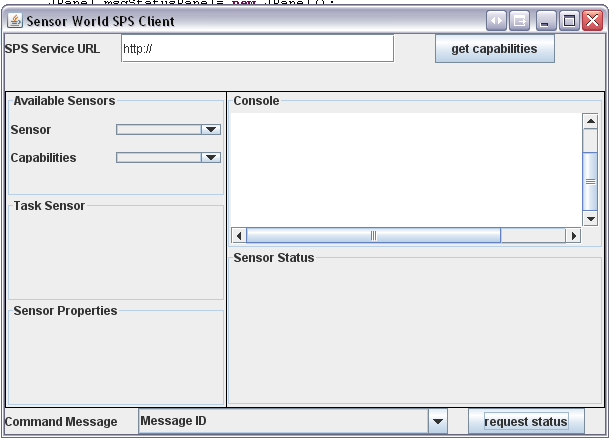
The SPS Client provides a graphical user interface for controlling the sensor and supplies further information about the phenomenon. Some basic functionalities and steps the client has to do and to deal with:- from the beginning the client needs the getCapabilities return value from the sps to get the information about the registered sensors and phenomenons
- the client can filter the information for each sensor in the system via the id to get the necessary input descriptor values in order to control the sensor and to let the user know which capabilities the sensor provides (which command the sensor can understand...)
- the user can choose a sensor from a list to control it and then the related command buttons appear for the different task the sensor is able to cope with.
- in general the client provides the first step of translating simple input values to xml requests the SPS works with. On the other hand displays it the returning values from the sensor world simulation
- the client should show the status of the command message when the user asks for it ( e.x. show the position of the command in the queue of the sensor)
Packages of the SPS Client
Possible Structure of the SPS Client project- org.n52.sps.client.sensorWorld.view containing the Gui Components for the general window with its controlling elements, information windows...
- org.n52.sps.client.sensorWorld.exceptions
- org.n52.sps.client.sensorWorld.client contains the main client class
- org.n52.sps.client.sensorWorld.util
Implementation Detail and Notes
Overview of the system startup: Sensor World with its components is running and registered in the SPSAdapter. By starting the SPS Client a connection to the SPS is established and the getCapabilities information will be received by the SPS Client , which displays the information about the sensor and phenomenons for the user. At the moment a fresh start up means, that when new Sensors are registered they are first registering in the SPS adapter which then sends a request to the SPS. After stored the information in the database and starting Sensor World again the adapter is checking with the getCapabilities request already stored sensor. The adapter also knows the adresses(jms) of the sensors stored in the AdapterDictionary. So one possibility would be to place a part of the functionality of the adapter in the plugin, since the plugin simulates the real hardware anyway. In my opinion now its kind of unnecessary to send the translated messages from the plugin through the Adapter to the Sensor, so instead the plugin could send command messages directly to the sensor. It just needs to perform the steps, which happen in the Adapter: transforming the parameters of the SPS request send by the client into sensor world understandable command messages and send them directly to the sensor. One problem i see at the moment is to store the adapter dictionary in the plugin itself, since the adapter needs to know the addresses of the components in sensor world. Another critical point would be to filter the right commands for the sensors, but that should actually happen already before displaying the choosable sensor information with its capabilities(at the moment checked in the Adapter).SPS Client GUI
- Die Task Sensor Komponente soll je nach dem welche Capabilites ausgewählt wird, dynamisch ersetzt werden (mit den Eingabefeldern die laut Capabilities benötigt werden).
- SensorProperties: alle wichtigen Sensor Angaben( Id,...)
- Sensor Status: aktuelle Position des Sensors, empfangene Nachrichten (Tasks, MeasurementResponses vom Phenomen,..)


| I | Attachment | Action | Size | Date | Who | Comment |
|---|---|---|---|---|---|---|
| |
SPSClient.jpg | manage | 96 K | 09 Jan 2009 - 15:23 | UnknownUser | |
| |
SPS_Client_Gui.bmp | manage | 785 K | 16 Feb 2009 - 23:22 | UnknownUser | GUI |
Edit | Attach | Print version | History: r19 < r18 < r17 < r16 | Backlinks | View wiki text | Edit wiki text | More topic actions
Topic revision: r18 - 15 Oct 2014, EikeJuerrens
- Toolbox
-
 Users
Users
-
 Index
Index
-
 Search
-
 Changes
-
 Notifications
-
 RSS Feed
-
 Preferences
- Webs
-
 AI_GEOSTATS
- Documentation
- GEONETCAST
- Geoprocessing
- Geostatistics
- Metadata
- Projects
- Sandbox
- Security
- Semantics
- SensorWeb
- System
- V3d
- Categories
Legal Notice | Privacy Statement
 Copyright © by the contributing authors. All material on this collaboration platform is the property of the contributing authors.
Ideas, requests, problems regarding Wiki? Send feedback
Ideas, requests, problems regarding Wiki? Send feedback